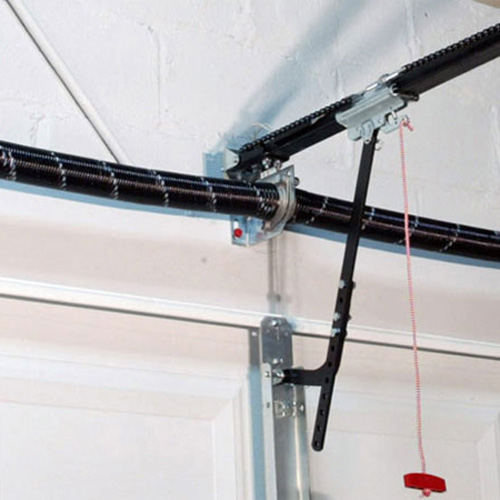
You love your car. You love your house to every corner. Then eventually one day you are going to have to repair your garage door torsion spring. You are stuck facing the broken garage door spring.
Most homeowners often overlook the importance of a garage door spring, even it’s used frequently. Since garage door spring repairing or replacement is a very common problem, what needs to be understood is that the basics and the only functionality of a garage door spring, is to lift and lower the door. So it is essential is to make sure that the garage door spring is repaired or replaced before any immediate emergency arises, or before it causes any damages to your other home décor furniture in your garage.
Garage door spring replacement can be quite complicated as the garage torsion spring is under immense pressure. It is very important to use the right tools and follow safe instructions strictly while replacing torsion springs. And if you are unable to follow the safety procedures and find the entire procedure too complicated then you should definitely hire a professional to get the job done for you.
Below are the steps to repair garage door spring, as suggested and instructed by many home décor catalogues and home décor websites as well, which will relieve you from all the mess:
- Unplug and disconnect the garage door opener from the door. Following that, lock the door and put a clamp on the track above any roller.
- Unfasten all the cables and cable drums. With the help of a ladder placed on either side of the cable drums, remove the set screws on the cable drum by loosening them. Then gently slide the cable drum away from the head plate once you have separated the cable from the drum. You will have to repeat this same process to remove the second cable drum as well.
- Now it’s time to remove the broken garage door spring. The garage door spring is connected to the center bearing plate, so this is where you disengage the spring from the plate using the ladder. Then go to the side of the door to slide the shaft out of the head plate, again with the help of the ladder. Make sure you move from the center to the side with the broken torsion spring.
- Detach the cable drum from the shaft. The broken garage door spring can now be separated from the shaft simply by sliding it down. Once the broken spring has been removed, slide the shaft back into the head plate bearing in order to hold up the shaft.
- Now put your gloves on. Inspect the entire cable and replace it if it needs replacing.
- It’s time to slowly and gently slide the new garage door spring onto the shaft and then carefully set the cable drum back onto the shaft as well. Then you slide the shaft back into the head plate bearing without making any screws tight.
- Now move the ladder to the center of the door to fasten the spring to the center bearing plate.
- Turn the cable drum in an anti-clockwise direction after sliding it over to the bearing plate up until it is tight. The first groove of the cable drum is where the cable is supposed to be at this point.
- Next step is to tighten the set screws, but please make sure not to over tighten them. Now to set the cable drum, place a pair of locking pliers in the opposite direction of the header on the shaft. You need to hold the cable tight while performing this procedure.
- You need to perform this procedure again for the opposite side of the door.
- Now it’s finally time to wind the spring. Place the winding bar into the opening of the winding cone, making sure that the bar has completely entered the winding cone.
- Next you have to measure the total amount of turns you will need to apply to your garage door spring by determining the circumference of your cable drum and matching it your garage door height.
- Once you have figured that out, raise the winding bar up towards the ceiling until the next opening in the winding cone accepts the second winding bar. Adjust the turns of the spring by only one-fourth at a time.
- Remove the first bar once you insert the second one and repeat the winding process.
- To make sure that the set screws have not become loose, you need to gently pull down on the winding bar. If the screws are loose, the winding cone will turn on the shaft. So make them tight before finally removing the winding bar.
- Separate the locking pliers from the shaft of the door. And then finally but very carefully test the garage door by manually lifting it with your hands to make sure that it doesn’t feel heavy or open too fast.
- Then re-attach and plug-in the garage door opener and test the system.
Hope this helps and we really appreciate getting your advice.